Adding products to your Shopify store involves more than just uploading images and typing a title. Proper preparation—from organizing product photos to writing compelling descriptions—helps your store appear professional and trustworthy. In this guide, we explain how to gather and format product images, how to maintain visual consistency, and how to upload products with variants, pricing, and descriptions. We also cover how to leverage tools like Photoshop, Canva, and ChatGPT to streamline the process. By following these steps, you ensure that each product page looks polished and encourages customers to buy.
Preparing Your Product Images
Gathering Images:
Before adding a product, collect all related images. Show multiple angles to give customers a clear view: front, back, side, detail shots, and possibly a full-body view if modeling apparel. If you lack final product images, you may use placeholder images temporarily, but remember to replace them with your own high-quality photos later.
Consistent Image Order and Naming:
Create a folder on your computer for each product. Within that folder, store images in a logical order. For apparel, name them to reflect their angle and product name. For example, if you have green shorts:
- green_shorts_front.jpg
- green_shorts_back.jpg
- green_shorts_detail.jpg
- green_shorts_fullbody.jpg
Keeping a consistent naming convention and sequence ensures a smooth upload process. Always display the primary “front” image first, followed by back, side, and detail images. Consistency builds a professional brand image.
Ensuring Uniform Sizing and Positioning:
When customers browse multiple products, consistent photo dimensions and positioning create a cohesive look. For example, ensure that all shirts, shorts, or pants align similarly within the frame. If one item appears much larger or off-center, your site looks messy.
To achieve this, open images in Photoshop or Canva. Align each product so the bottom hems and top edges appear in the same positions. Keep background colors identical—pure white is a common choice. Avoid slight background color mismatches. Consistent sizing and background enhance a high-end feel.
File Formats and Conversions:
If you receive images in unusual formats (e.g., AVIF), convert them to standard JPEG or PNG. Use free online converters like “cloudconvert.com” if needed. Typically, your photographer should provide compatible images, but if not, quick conversion ensures you can upload them smoothly.
Writing Product Titles and Descriptions
Naming Your Products:
Choose clear, descriptive product names. Include key details like style or fit. For a t-shirt, you might say “Signature Oversized Training Tee” rather than just “T-Shirt.” For shorts, maybe “Signature Training Shorts” plus the color (e.g., “Signature Training Shorts (Tan)”). Good naming helps customers quickly identify what they’re viewing.
Creating Detailed Descriptions:
Write product descriptions that highlight fabric, fit, features, and intended use. Mention measurements (e.g., inseam length), fabric stretch, pockets, zippers, and any moisture-wicking or quick-dry capabilities. If you sell apparel, note the model’s height and the size they wear. This detail helps customers choose the right fit.
Using ChatGPT for Copy Assistance:
If you struggle with writing, ask ChatGPT to help craft a compelling description. Provide ChatGPT with product details: brand ethos, product features, fabric qualities, and suggested uses. It generates a polished description. Then refine and personalize it. Always ensure authenticity and consistency with your brand voice.
Formatting Your Description:
Use short paragraphs or bullet points. Highlight key specs in bold. Keep it scannable yet informative. For example:
- Fabric: Moisture-wicking, quick-dry with slight stretch
- Features: Four zipper pockets, 5-inch inseam (for shorts), breathable mesh lining
- Use Cases: Ideal for running, gym training, or casual lounge wear
This structured approach makes your descriptions easy to read and understand.
Adding Products in Shopify
Accessing the Products Section:
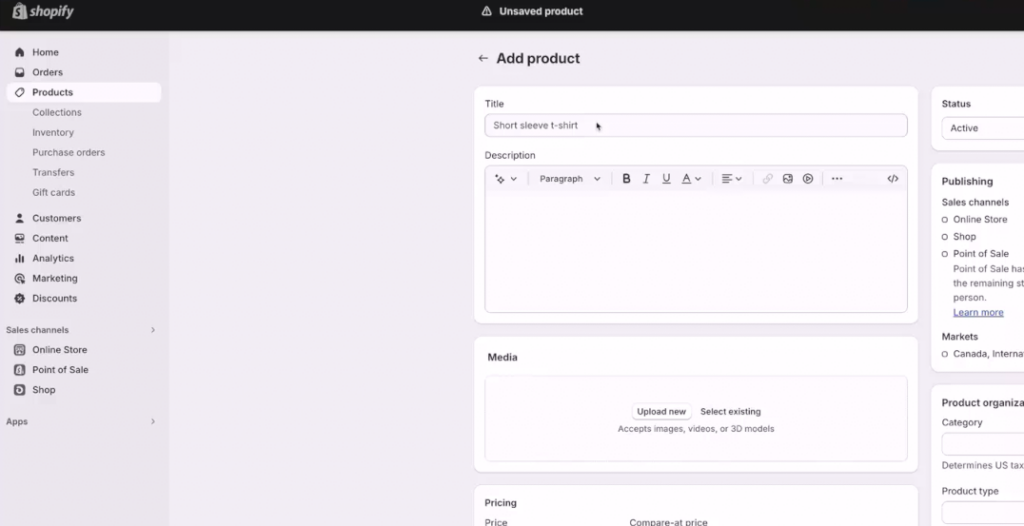
In your Shopify admin, click Products > Add product. You’ll see fields for title, description, media, pricing, and more.

Uploading Images:
Click Add media to upload the prepared images. Start with the front shot as the primary image. Then add back, side, and detail shots in a consistent order. Ensure all files are standard formats (JPEG or PNG) and not too large to cause slow loading.
Pricing and Cost Details:
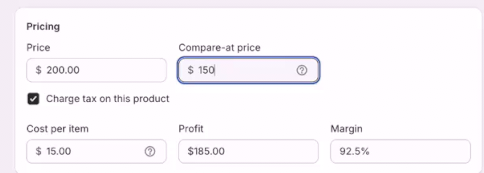
Set your product’s price. Add the cost per item if you want to track margin inside Shopify. If you plan a sale, you can use the “Compare at price” field to show a discounted rate. For example, if the product costs $200 normally, and you set “Compare at price” to $250, customers see a price drop. Without a discount, leave “Compare at price” blank.

Weight and Shipping:
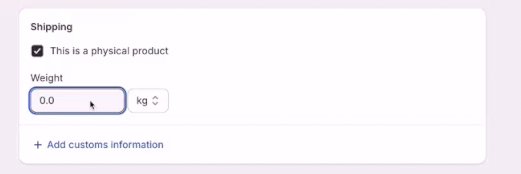
If you charge shipping by weight, weigh each item and enter it here. Proper weight entries let Shopify calculate accurate shipping costs at checkout.

Product Organization:
Assign product type (e.g., “Shorts,” “Pants,” “T-Shirts”) and vendor. Add products to relevant collections so they appear in the correct sections of your store (e.g., “Men’s Training Wear”). If you only have a homepage collection now, you can update collections later. Proper organization helps customers find items easily.
Variants (Sizes and Colors):
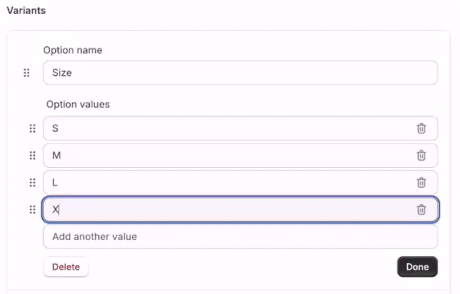
For items with multiple variants, like sizes (S, M, L, XL, XXL) or colors, enable variants. Enter each size or color name, ensuring consistency and clarity. If each variant has its own image (optional), assign it accordingly. Variants help customers pick the right product option without leaving the page.

Status and Visibility:
Choose whether to set the product as draft or active. Draft products are hidden from customers until you finalize details. Active makes the product visible in your store. If you’re still testing, start with draft, and switch to active once everything looks perfect.
Saving the Product:
Click Save after you enter all info. If you need similar products, use the “Duplicate” feature for faster entry. Just remember to change names, colors, images, and relevant details in the duplicated product.
Maintaining a Consistent Look and Feel
Check Background Colors and Alignment:
After adding products, preview them on your live store or a theme preview. Make sure all product images share the same background hue and item scale. Consistency across products enhances the professional look.
Copy and Layout Consistency:
Keep your product descriptions, bullet points, and bold highlights uniform across all items. If one product shows model info and washing instructions, do the same for all products. Consistent formatting helps buyers browse multiple items without confusion.
Refining Over Time:
As you add more products, continuously improve your process. Update older product entries to match newer standards. Tweak descriptions, reorder images, or improve sizing if needed. A consistent, high-quality catalog encourages trust and repeat visits.
Handling Special Cases and Automation
If Photographer Files Need Adjustment:
If your photographer’s images differ in size or color tone, standardize them. Even a small hue difference can look off on your site. Use Photoshop or Canva to set uniform dimensions and backgrounds.
Batch Conversions:
If you have many images in problematic formats, use bulk converters (like CloudConvert) to turn them into JPEG. This saves time and ensures uniformity.
Using ChatGPT for Multiple Products:
For each product, feed ChatGPT the required details and let it produce a starting point for your description. Then refine. This technique is efficient if you must add many products quickly while keeping descriptions engaging.
Conclusion
Setting up products on Shopify goes beyond a simple upload. By carefully naming images, maintaining consistent sizing and backgrounds, writing thorough descriptions, and using proper variants and collections, you create a polished browsing experience. Over time, this consistency and attention to detail sets your brand apart, making customers more likely to trust and purchase from your store. With the right tools, methods, and ongoing refinement, your product listings can look professional, informative, and appealing to potential buyers